The current page does not exist in the target language.

Do you want to change the language and go to the home page or do you want to stay on the current page?

Change Language
Solar Energy
Home owners

Fronius Wattpilot

Frequently asked questions

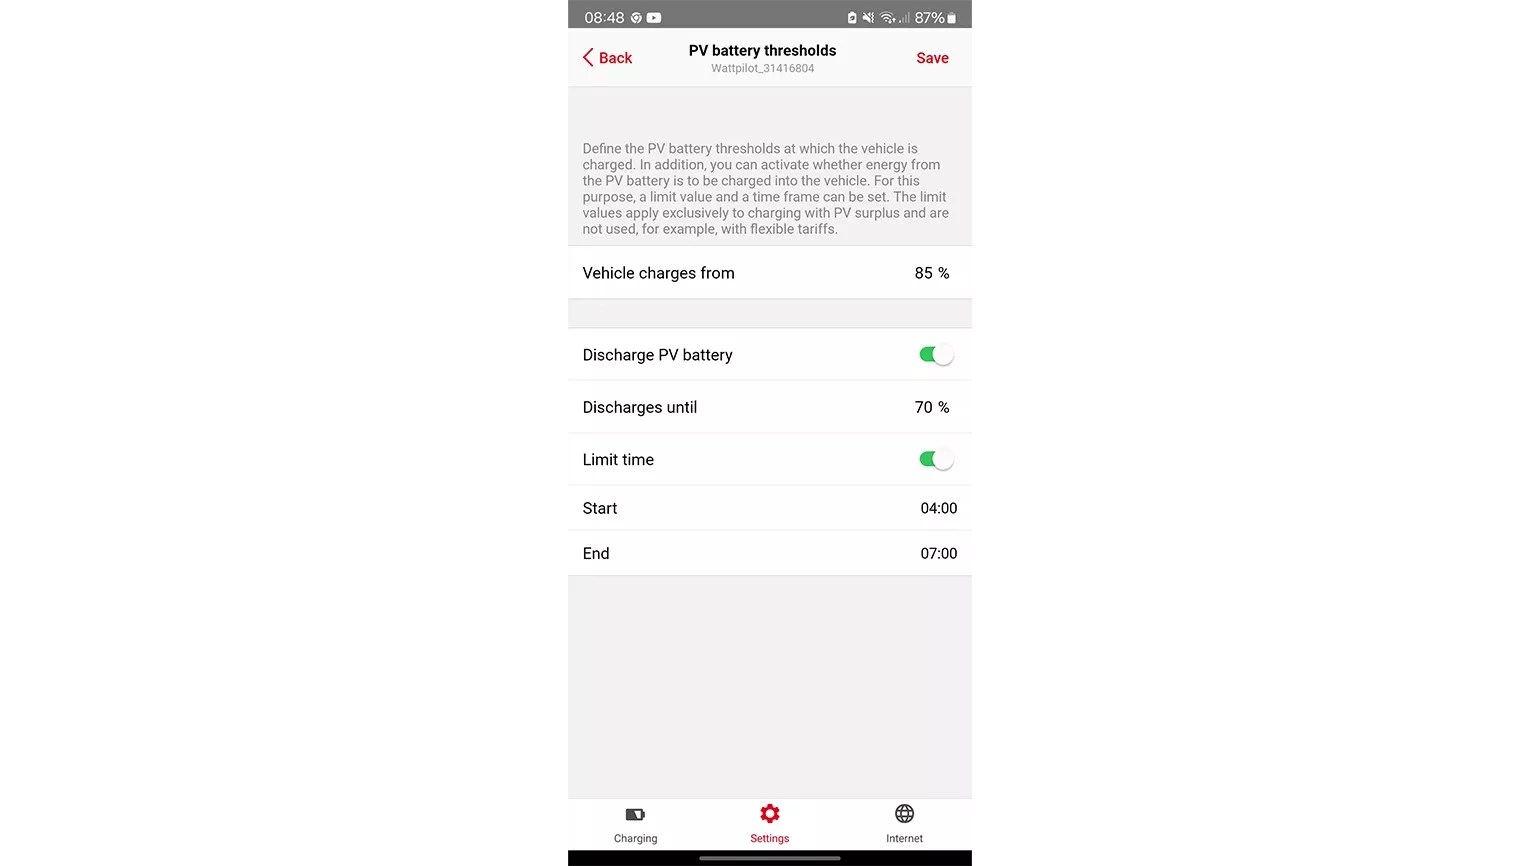
On this page, we answer many questions about the Fronius Wattpilot.

General

For simple charging, it is sufficient to supply the Wattpilot with power and plug in the car. Special settings (PV optimisation, charging modes, etc.) can be made via the Solar.wattpilot app.
Sie können den Wattpilot mittels WLAN in ein Netzwerk einbinden. Befindet sich der Wattpilot außerhalb der WLAN-Reichweite, kann das WLAN-Signal mittels Repeater, WIFI Access Point oder PowerLine Adapter erweitert werden.Weiters kann der Wattpilot Flex mittels Ethernet eingebunden werden.
The warranty period is 2 years. Since 1 August 2024, the warranty period has been increased to 3 years.
Yes, that is possible. Any number of Wattpilots can be operated in parallel. Each Wattpilot must be individually integrated into the network. However, PV optimization only works with one device at a time.
Yes, that is possible. You can use the Fronius Wattpilot for any electric vehicle. With the Type 2 socket, you can even charge vehicles with a Type 1 connector. Simply use the appropriate charging cable for your vehicle.
The Wattpilot Go is a mobile charging solution and can be taken anywhere.
RFID stands for "Radio Frequency Identification". With these ID chips, you can authenticate yourself on the device and, for example, unlock the Wattpilot. Authentication is especially important if you install the Wattpilot in a publicly accessible location, such as an underground garage. Multiple ID chips can also be used for one Wattpilot. This way, several people can charge at the same device, but the energy amounts are recorded separately.
If you have any questions about the Wattpilot, you can always contact your installer. You can also find a lot of additional information about the Wattpilot on our product page as well as on the Fronius YouTube channel.
Wattpilot Flex: Wattpilot Flex, mounting bracket and Type 2 plug holder including screws and dowels, reset card, 2 ID chips, quick guide, strain relief 10-15mm and 15-20mm including screws, 2 cable ties, 6 rubber grommets. Optionally, ID chips (10 pieces) and a stand can also be purchased.
Wattpilot Home / Go: Mounting bracket, including screws and dowels, Wattpilot, theft protection, reset card, ID chip, and quick guide. Optionally, a Type 2 cable (5m), ID chips (10 pieces), an additional mounting bracket, and various adapter sets can also be purchased.
The production of the Wattpilot takes place in Austria.
The Wattpilot 2.0 was developed due to a normative change (IEC 61851-1:2019 and IEC 62752:2016). This standard only affects the manufacturer. The previous version of the Wattpilot 2.0 may continue to be sold and used.
The Wattpilot 2.0 is produced with a newly designed housing. This ensures a higher IP protection (IP 65 instead of IP 54). The protective contact adapter cable is made shorter. The WLAN range has also been improved. In line with our sustainability strategy, more components from Europe are used to avoid long transport routes. Furthermore, there are two new versions of the Wattpilot 2.0: the Wattpilot Home 22 J 2.0 and the Wattpilot Go J 22 2.0 AUS (for Australia). All known software features such as PV surplus charging, etc., are still available on both the Wattpilot (1.0) and the Wattpilot 2.0.
  • Fixed attached 6m Type-2 charging cable
  • Intuitive user experience and high-quality product design
  • A dedicated button for each mode
  • Dot Matrix power and energy display
  • Continuous LED ring
  • Simple, elegant, and high-quality design (Winner of the German Design Award 2025)
  • Billing-capable: Integrated MID meter / Measurement and Calibration Law compliant (Pro only)
  • Connection area in the wall mounting plate with built-in spirit level and additional LAN interface
  • Cable entry from top, bottom, and rear
  • Plug holder and two RFID tags included
  • ISO15118 (Plug & Charge) ready (hardware-wise)

Installation and commissioning

A Fronius inverter with a Fronius Smart Meter at the feed-in point is required. The following Fronius inverters are compatible with the Wattpilot: GEN24, Verto, SnapINverter from Datamanager 2.0, as well as IG, IG Plus, IG TL and CL series in combination with a Datamanager 2.0. The combination with a Fronius Ohmpilot and a Fronius compatible DC-coupled battery is also possible.

The Wattpilot can also be operated with a third-party inverter in combination with a Smart Meter IP or a Datamanager Box 2.0 and Fronius Smart Meter at the feed-in point. However, no other self-consumption regulations (battery, Power2Heat, etc.) may be implemented in parallel, and household consumers are not taken into account in the display in the Solar.wattpilot app. 

The commissioning of the Wattpilot is done with the Solar.wattpilot app. For various settings and remote access, the Wattpilot must be connected to the internet.
Yes! No additional recurring inspection and therefore no service is necessary. Please note any existing local regulations.
The Wattpilot Go can be easily plugged in if a CEE16 or 32 socket is available. The Wattpilot Flex and Wattpilot Home must be permanently wired. Installation and commissioning by an installer is recommended for all variants. This can be done very quickly.
The Wattpilot can be installed upright both indoors and outdoors. Due to the IP protection class IP66 of the Wattpilot Flex and IP65 of the Wattpilot Home / Go, the Wattpilot can also be exposed to precipitation. Direct sunlight must be avoided for the Wattpilot Home / Go.
  1. Please ensure that you have entered the password correctly (note the case sensitivity).
  2. Avoid large distances to the router (or access point). The Wattpilot's Wi-Fi reception is best when the router or access point is in front of or to the right of the Wattpilot. If the distance is too great, use a Wi-Fi repeater.
  3. The Wattpilot cannot be connected to or operated with 5GHz Wi-Fi networks.
  4. In some cases, it is possible that the Wattpilot cannot be controlled via a mesh network or powerline. This is implemented differently by each manufacturer of network accessories, so we cannot guarantee general compatibility with mesh networks or powerline. Therefore, if you experience connection problems with an enabled mesh network or powerline, check if the Wattpilot can be controlled via Wi-Fi without these functionalities.

Features

The charging modes can be changed both via the app and with a button on the device.

“Vehicle charges from” – this setting means that the Wattpilot may only use the entire PV surplus once the storage has reached this value. However, the Wattpilot can start charging before this value is reached, e.g. if the PV battery cannot be charged with a higher power and there is an additional PV surplus. Once “PV battery discharges” is activated, the PV battery will discharge to the value “Discharges to”.

Once the SOC level of the PV battery is higher than the value “Discharges to”, the Wattpilot may discharge the PV battery to the set limit. If the “Restrict time” function is also activated, the storage will only be discharged within the specified period.

No, that is not possible. However, a specific amount of energy in kWh or km can be set to be charged into the electric car by a defined time.
No, that is not possible with the Fronius Wattpilot.
The Wattpilot is visualized in Solar.web. In the Solar.wattpilot app, settings, updates, and simple visualizations are possible.
Of course not! The Wattpilot can be operated optimally both with and without a PV system. You can charge particularly cost-effectively if you use your self-produced electricity from the roof.
The LED ring can indicate the current charging current, the type of charging (1-phase or 3-phase), or the installation of an update. On the Wattpilot Flex, the LED ring shows the proportion of electricity for charging the vehicle coming from the sun, battery, or the power grid. The dot matrix display on the Wattpilot Flex alternately shows the total charged energy, the energy charged during the current session, and the charging power.
You can easily switch to a variable electricity tariff yourself. Detailed information about the switch can be found on the homepage of the respective energy provider.
The variable electricity tariff can be activated under "Settings" – "Cost Optimisation". Depending on country-specific availability, either specific tariffs or bidding zones can be stored. A bidding zone is a defined geographical area in the energy market where electricity is traded at the current market price. The additional surcharges of the specific electricity tariff used must be manually added.

Currently, there is no standard for smart charging. Therefore, certain car models may experience limitations in cost-optimized charging. Fronius is working to configure the optimal charging behavior for each vehicle.

The following car models are affected:

  • Renault Zoe (minimum charging current 10A)
  • Twingo (minimum charging current 10A)
  • Kia e-Soul
  • Mitsubishi i-MiEV
  • Citroen C-Zero
  • Peugeot iOn
  • VW ID.3 / ID.4 (the charging behavior requires that the charging process must not be interrupted)

Since vehicle manufacturers continuously offer new software updates, limitations may have been resolved. You can find the selection of the car model in the Solar.wattpilot app under Settings - Cost Optimization - Car.

No, the Wattpilot can also be used without a variable electricity tariff.

All settings can also be made locally by connecting to the Wattpilot's hotspot. This is permanently open and secured with a password. The following functions are not possible without a network connection:

  • Remote app access via the internet
  • Pairing with the PV system (PV-optimized charging)
  • Use of flexible electricity tariffs
  • Dynamic load balancing
  • Software updates
The Wattpilot can be reset to factory settings using the RFID Reset Card included in the delivery and in the Solar.wattpilot app under Internet / Factory Settings.
Für das Dynamic Load Balancing wird ein Fronius Smart Meter IP oder ein kompatibler Fronius Wechselrichter mit Fronius Smart Meter oder eine Datamanager Box 2.0 mit einem Fronius Smart Meter am Einspeisepunkt benötigt.

Yes, prioritization is possible. If the same priority is set, the following prioritization applies:

  • Priority 1: Standard Mode
  • Priority 2: Next Trip Mode
  • Priority 3: Eco Mode

If the same charging mode is used, the power is evenly distributed.

Yes, this setting can be activated in the Solar.wattpilot app under "Settings" – "Load Balancing" – "Dynamic Load Balancing". This setting is necessary if the maximum current capacity of the supply line to the Wattpilot charging boxes is lower than the total current of the Wattpilot charging boxes. This prevents the circuit breaker of the supply line from tripping.
With the charging timer, charging can be blocked or allowed at specific times. This allows, for example, cheaper electricity tariffs to be used overnight. The charging timer can be activated in the Solar.wattpilot app under "Settings" – "Charging Timer". With the additional setting "Allow/Block Charging + PV Surplus", charging (grid & PV surplus) is allowed/blocked during the defined period. However, PV surplus is still charged during the blocked times.

The Wattpilot Flex is equipped with ISO15118 communication hardware, which is a basic requirement for bidirectional charging. However, further requirements are necessary for bidirectional charging:

  1. The electric car must support bidirectional charging. There are already a few vehicles on the market that can charge bidirectionally with a special wallbox. However, this is usually not satisfactory for the end user, as the wallbox may no longer work if the vehicle is changed. Most systems offer emergency power supply, but not a grid-connected function that allows, for example, the house to be supplied with the vehicle at night.
  2. If energy is fed back from the electric car into the house or even into the grid, the respective requirements of the grid operator must be met. In the case of an AC wallbox, the electric car must support this functionality, which means that an electric car must distinguish between different grid requirements depending on where it is connected.

In short, while the Wattpilot Flex is equipped with ISO15118 hardware, it does not yet support bidirectional applications.

Tip: Pay close attention to wallboxes from other manufacturers, as ISO15118 hardware is often mistakenly equated with bidirectional charging!

Solar.wattpilot App

You can download the app from the Google Play Store (Android) and the Apple App Store (iOS).
German, English, Spanish, French, Italian, Dutch, Swedish, Finnish, Hungarian, Greek, Polish, Turkish, Romanian, and Czech.

All information about the charged electricity amounts is displayed in the Solar.wattpilot app and can be downloaded as a CSV file.

The Wattpilot Flex shows total energy, energy of the current charging session, and current charging power on the dot-matrix display.

Yes, all types of Wattpilot are displayed in the Solar.Wattpilot app.

Solar.web

Yes, multiple Wattpilot charging boxes can be added to a PV system in Solar.web.

You can add your Wattpilot to your PV system in Solar.web under the "Settings" – "Components" tab. You will need the serial number and the V-code (on the nameplate on the back of the device).

If you have not yet created a PV system in Solar.web, register at www.solarweb.com and add your Wattpilot and the coupled inverter when creating the PV system. When adding the Wattpilot to Solar.web, we recommend that the Wattpilot currently has an internet connection and is coupled with the inverter. It is also possible to add an offline Wattpilot to Solar.web, but Wattpilot data will only be displayed once the Wattpilot is online and coupled.

To ensure Wattpilot data is displayed in Solar.web, please make sure of the following:

  • The Wattpilot (as well as your inverter) must be added to your PV system in Solar.web under the "Settings" - "Components" tab. If this tab is not visible to you, ask your installer to assign you "Owner" or "System Maintenance" rights for your PV system.
  • Both the Wattpilot and the connected inverter must be connected to the internet.
  • The Wattpilot must have firmware version 36.0 or higher. You can update your Wattpilot in the Solar.wattpilot app under the "Internet" tab. The Wattpilot must be connected to Wi-Fi and paired with your inverter. To do this, go to the "Settings" - "Cost Optimization" tab in the Solar.wattpilot app and pair the Wattpilot with the inverter there.
  • If the connected inverter is a GEN24 or Tauro, it must have firmware version 1.12 or higher. You can update your inverter in Solar.web under the "Settings" - "Components" tab.
The Wattpilot must be paired with the new inverter in the Solar.wattpilot app under the "Settings" - "Cost Optimization" tab. The inverter must be replaced in Solar.web under the "Settings" - "Components" tab. After that, all Wattpilot data will be displayed again in Solar.web.

For periods when the Wattpilot has no internet connection (e.g., due to weak Wi-Fi), no live and historical data will be displayed in Solar.web. The data will not be restored when the Wattpilot reconnects to the internet.

Furthermore, Wattpilot data will only be displayed if the Wattpilot is paired with an inverter that is in the same PV system in Solar.web. For example, no data will be displayed in Solar.web for periods when the Wattpilot Go is used on the go.